Quantcast
Channel: Renoise blogs
Viewing all 60 articles
Browse latest View live

Meet up at the pool party in Los Angeles, Sunday October 24th 2010

$
0
0

It's end of summer and we're going party like we just don't care. "Team Renoise and Team Indamixx is gunna BANG THE BOX in 2011 and it's gunna start right here in Los Angeles by the way of BERLIN!" That's right, we're having a pool party at "The Standard Downtown" Los Angeles next Sunday, 24th. The party starts at 1 PM. Free drinks and T-shirts between 6 PM and 8 PM, brought to you by Indamixx and Renoise while supplies last. If you're going to be there, and of course you are!, sign up in the following forum thread by Saturday midnight PST: Los Angeles Renoisers Unite! Pool Party

Here are some pictures for you from the place to be, "The Standard Downtown" LA:

See you Sunday night... Respect!

Category: 

Renoise 2.6 Goes RC - First Renoise 2.6 Demo Versions

$
0
0

After months of testing and feature finetuning, especially for Renoises new scripting API, Renoise 2.6 gets very close to its final release now.

About Renoise 2.6

If you are a registered user and haven't tried out Renoise 2.6 and all the third-party and MIDI controller tools that are available already, then this its a good chance to do so now. If you are no registered user yet, you can give the new features of Renoise 2.6 a try now.

Download

The first release candidate is now available for registered users at the Renoise Backstage.
Free demo versions are available at the Renoise Download page.
Category: 

Renoise 2.6 Final - Script Everything

$
0
0

Renoise 2.6 Final, a tribute to the most tech savvy users, is out now. The highlight of this release is the scripting engine, which allows users to code new features in scripts that can be plugged into Renoise in packages called Tools. Furthermore there are some exciting changes under the hood, one of which makes working with longer samples a lot easier.

Script everything using an open API

Lua is a light-weight programming language, which together with the Renoise API allows you to build add-ons quickly and easily.

Scale Finder

Lua scripting, introduced as part of the beta cycle in July, has already resulted in a plethora of new tools, as well as native support for the following hardware: AlphaTrack, BCF-2000, BCR-2000, KONTROL49, FaderPort, microKONTROL, nanoKONTROL, Launchpad, Remote SL-MKII, Nocturn, Monome, Ohm64, iPad via TouchOSC... All created by the Renoise community on their own dime, just for the fun of it.

Check out the new tools page for more: http://tools.renoise.com/

Sample Autoseek

Samples have a new setting, "Autoseek", which will, when enabled, make them behave like a traditional audio channel. You can start playing back the song at any position, and the sample will automatically seek to the current position in the song without having to be triggered.

And More

  • Open Sound Control (OSC) Server Support.
  • Duplex - MIDI/OSC controller framework.
  • DSSI Support on Linux, 64-bit Linux Version.
  • Support for CAF, AIFC, SND and AU Files.
  • Linux & Mac OSX Performance Tweaks.
  • Usability and functionality refinements galore.

Duplex

The full scoop, here:What's New in Renoise 2.6?
Category: 

Maintenance update: Renoise 2.6.1

$
0
0

A maintenance update for Renoise 2.6 is now available. The update is particularly recommended for Linux 64-bit users.

Changes and fixes for the following problems

Download

Category: 

Artist In:Depth - Saine! Long Time No See

$
0
0

Long-time Renoise fan Saine has just released his new album Long Time No See on both vinyl and digital formats on Helsinki-based Cymbidium Records. It's a genre-blurring ride through downtempo beats, smooth instrumental excursions and deep late-night house vibes. We quizzed him on his approach to music making in general, with a particular focus on Renoise, naturally.

Who are you and where are you from?

My name is Lauri Saine and I'm a musician from Finland. I currently live in the capital, Helsinki.

So your moniker Saine is actually your real name?

Yup it's my surname, I remember just sticking with it for the simplicity, after figuring some more techy name alternatives might eventually turn out to be cheesy.

A lot of the music on your latest album sounds like it's played live rather than sequenced - a case in point being the piano piece After What Seemed Like Forever - is that the case?

Yes that theme is 90% improvised live during one misty spring night/morning, although usually it's a combination of both. Many of my tracks are 90% programmed as well and often the live-sounding things can have quite a bit of different takes and sequencing behind them. Also I don't have the skills to just press record and spontaneously get to a finished result in one go, so I do edits afterwards. I like combining improvised, experimental things with surgically programmed elements and see how they work together.

Long Time No See by Saine

I think it'd be safe to assume that most Renoise users are not proficient instrumentalists, but rather more technically-minded music producers. How do you find working with live recordings in Renoise, as it's not traditionally seen as one of its strengths?

A good question. For me personally, working mostly with shorter recorded clips and loads of them, it works well. I don't end up with a messy audio pool filled with oddly named, often unneeded temporary clips taking up HD-space. Instead I get to keep the project neat and organized while I'm doing recordings and all the relevant files stay within reach. The way I look at it, there's not a big difference between a live recording and other types of musical elements. Take sampling for instance: it often falls somewhere in-between to begin with, and I like to treat them as equal building blocks for new music.

If we were talking about regular multitrack sessions with a band where the drums alone can have a dozen mics, a traditional piano roll sequencer would surely suit the purpose better. For me as a sample-focused musician though, it's way faster to work with a tracker interface, allowing me to visually line up all notes next to each other, while having the track commands and built-in audio editor/recorder near at all times. I do lots of spontaneous recording from anywhere I can think of, so it's good to have these tools close by.

While a traditional piano roll view suits the recording of simultaneous tracks and moving these large chunks of audio around, working with shorter samples, it's a different story - trying out combinations of different pitches and timings, it's important to see those building blocks from different tracks constantly in front of you. Using Renoise I don't have to think about how to overcome limitations such as not being able to put several different audio samples on top of each other on the same track at different pitches, giving each sample individual volume envelopes etc. Of course you can always find alternate routes for this type of thing, but instead of seconds it will take minutes - a lifetime when the inspiration is hitting and you just need to audition several different approaches quickly.

Pretty much any software can do amazing things in the right hands of course, but a comfortable workflow really makes a huge difference in terms of creativity. A lot of people are scared of the matrix-like tracker interface and I bet it can look intimidating at first, but to me it just means less annoying windows and not having to switch back and forth between tracks and views all the time.

How did you find out about Renoise and what attracted you to it in the first place?

I remember stumbling upon a screenshot around 2003 and got interested. I think there was a competition going on for the name of the software. I had used MadTracker for a couple of years. It was fast and stable, but seeing it fade away and become old-fashioned at the time, I started to do things with sequencers such as Logic Audio and Cubase. I was unable to find my comfort-zone though, even though these are powerful pieces of software. Again, these were great for some purposes or working with MIDI, but sessions often required a scary amount of setting up so you could no longer begin making music in an instant, templates or not. Everything was dependent on strict folder structures so projects were no longer easy to move around and every little thing seemed to require quite a bit of zooming views in and out, opening and closing windows.

So eventually I felt like that interface was initially built for different working methods. FastTracker II was my first love around 1995 so Renoise basically felt like going back home. The home was now pimped out with goodies like VST support, so it fit like a glowe.

The album is very organic-sounding, and despite the range of styles on offer, sounds very coherent. Do you have any special tricks in terms of post-processing to achieve that coherency?

When I first started sketching how this album ought to sound and feel like, I laid down certain guidelines for myself regarding processing. I was aiming for a dusty, nostalgic feel without ending up too retro/gimmicky and also maintain a sort of sparkling/fresh vibe in between. The album doesn't have featuring artists or vocalists so I wanted to have enough "room" to maneuver between these realms soundwise - to make sure I'd get enough variation between tracks.

For some elements throughout the whole album, I used similar processing chains and techniques. Like with transients and exciters for drums, I used pretty much the same tools throughout the album - the sample material I used varies quite a lot between tracks so I figured this might glue it all together a bit. The album was mastered by Fabien Schivre, which also plays a part in the coherent end result. He really "got" the idea I was after very quickly and helped create a dynamic, creamy tone for it. We both agreed on dynamics before loudness.

I believe these subtleties of sound are an important thing, not mere nitpicking - and also a part of the actual creative process. A good dish wouldn't work with the wrong seasoning. It's all a "work in progress" for me of course when it comes to sound/mixing, and there are always so many things to improve on, but that's what makes it so much fun.

Do you use any hardware or outboard gear or is everything done on the computer? And in more general terms, do you prefer working with software or hardware?

I use some hardware yes, but mostly I work in a small, budget homestudio with not that much gear. The reason is purely financial. I use a tube stereo compressor/eq frequently, some effect pedals here and there, running VSTi's through c-cassette and such. Sometimes I like to record samples with a mic through vintage speakers, small things like that. But these depend on the situation and sometimes the simple approaches work best. Overall I believe people often focus too much on the gear used and specifically whether it's expensive, street credible gear or not.

Of course it can be important to work with proper equipment and to have good AD/DA converters, good speakers etc - but in the end it's still a relatively small fraction of the whole picture so one should at least not spend more time on that than on the actual music! It's possible to get incredibly nice sound from just software alone, with a bit of enthusiasm - just like it is possible to make amazing things with say, nothing but a worn-out guitar.

I think it's generally a good idea to embrace both side-by-side and just use what feels good - at least it would seem very silly to leave the other out completely, as both have their unique plus sides. An increasing amount of albums are being made completely in-the-box and the results can be incredibly good, even warm/analogue sounding. But I am a fan of the 60's/70's sound and it is still quite rare to hear that level of dynamics/warmth in electronic music. So if it wasn't so expensive, I would definitely get some hardware gear around here, no doubt. Plugins are also getting better and better at an incredibly fast rate, though. Whatever suits your music best, I say.

I keep finding myself back in the 90's when listening to your album, both April and Jetpack have a definite St. Germain or mid-90's French deep house flavour to them, and in other places there's quite a Mo Wax feel. Are these conscious influences and is this a period you feel some affinity with?

It's nice you picked that out! The mentioned were some the most powerful sources of inspiration when I was first starting out, as well as mid-90's hiphop. That era is when I got into this thing, so I guess it's unavoidable that fractions of it remain. With basses especially, I wanted to get that fluffy roundness, especially on those beat-focused tracks. I like to keep a little bit of distance to the very trendiest and freshest things that are going on, they seem to fade out as quickly as they appeared.

Yes, you definitely nailed that bassy, murky, thuddy roundness that's so characteristic of those records. How do you feel about the current climate for the type of music you produce?

Apparently these more "mellow" styles which I guess my music more or less represents, haven't been very trendy the recent years, compared to more aggressive/masculine styles of electronic music. Perhaps due to the overload of triphop/nu-jazz after the turn of the millennium, they are often associated with cheesy elevator music. Which is funny if you think about it - a lot of that "powerful" stuff is cheesy as hell just the same, but you get away with it: it's loud and impressive for a while. Long enough to move on to the next. This might be changing as we speak, though. I might be wrong but this whole techno/dubstep/grime cocktail does seem to have similarities to the drum and bass scene a little more than a decade ago: burning the candle at both ends leaves few surprises to expect. Still, let all flowers bloom, of course!

On the one hand we're living in great times now, virtually anyone can get their music heard and have access to the tools and there's always a very colourful spectrum of new music appearing in some corner of the world, it's unbelievable really. On the other hand there's so much of it now - the rate of new releases appearing is evergrowing while the attention span of the average, overworked person is that of a hummingbird, I sometimes feel like people don't have the energy to really focus on things anymore. In my case I sometimes feel it leads to all the "bright" things that shout for attention getting noticed in an instant, while things that might require a bit more settling into, often end up being completely lost at sea. Like you observe a traffic sign each day on your way to work, but never once stop to look at the beautiful tree behind it.

Ah well, making music for the sake of music is more and more exciting by the year, I don't seem to get bored of it, but in terms of really getting it out there or ever earning a dime for it, things are looking gloomy as ever. Overall I try not to think about that too much now hehe...

A good attitude to have. To finish off with, who would you say have been your biggest musical influences? Those artists that you keep coming back to over the years and that have meant a lot to you.

Such a tough question each time, from among a whole lot of different acts I'll just say A Tribe Called Quest. I remember being really impressed by the way they used samples, back when I was 15 or something, and I still find myself going back to their records every now and then. Certainly an influence.

For more info on Saine, check out his website at www.sainemusic.com. The vinyl edition of Long Time No See can be ordered from cymbidium.highwire.com, and the digital edition is available from all the usual outlets.

Category: 

Creative Use of Send Tracks

$
0
0

In my previous twoarticles I have focused on technical matters, but now it is time to take a good look at one of the more creative aspects of Renoise: using Send Tracks. Time to have some fun! Confident use of Send Tracks not only helps you create a clean mix, it also opens doorways to creative sound-design. Another way of saying it: Send Track use holds the key to a lot of classic mixing routines, as well more creative and 'out there' tricks.

Some of you may know these routines and tricks already, but please do read on to refresh your knowledge, perhaps getting your mind to think about new possibilities. For those of you who are completely new to the idea of sends: let's get into it. This article assumes a little basic knowledge of how to use Renoise as well as some common basic audio mixing terms – so if you get stuck on something, read-up first and feel free to ask a question at the end.

I will firstly look into the routing structure of Renoise to demonstrate the basics of how Send Tracks can be used. I will then look at some common and not-so-common send routings using Renoise's internal effects. Finally, I will show how sends can be used to form 'group sends' to apply common effecting. I'll drop in some pointers on how to neatly effect and organise sound so that your work lends itself to a better mix.

Basic Use of Send Tracks

The concept of Send Tracks (or 'sends' for short) is a mirrored concept from analogue hardware mixers. Hardware mixers have individual channels (or a 'track') for each sound – i.e. one channel for the kick, one for the bass, and so on. However, mixers usually have a limited amount of effecting control on each channel, usually just controls like volume, pan, and EQ. If the individual sounds need further effecting then the audio has to be sent from the channel output to external hardware effect units such as tape echo or spring reverb. The sound is altered with effects, then results need to be reconnected to the mixer for mixing and further balancing. Thus, mixers have additional channels labelled as 'effect return channels' or 'receive channels', so that the mix engineer could further adjust the volume, pan and EQ of the effected sound. The overall process can be referred to as routing.

Shot of a hardware audio mixer that shows the FX sends for each channel and the FX receive channel.

When digital audio came about, programs copied this concept in one way or another. Usually it is just an additional channel or track that you can send audio to for further effecting.

Renoise does this by using Send Tracks, and a routing tool called the #Send Device. If these things seem totally unfamiliar to you then you need to first learn the fundamental facts from the Renoise online manual. See here for the basic Send Track explanation, then the Send Track in the Mixer View explanation, and finally read the #Send Device explanation. That flow diagram with the green lines is a particularly useful one to come back to in understanding how Renoise organises sending:

Send Device flow diagram

Let's quickly set up a send routing for ourselves. Open up one of your XRNS files, or alternatively one of the Renoise demo songs. In either the Pattern Editor View or the Mixer View click on the 'Mst' track (the master channel) and press Ctrl/Command+T. This will add a Send Track right next to the master channel. Take note of the Send Track label, it will be something like S01 – you can rename it as you wish, but you need to remember the label when you are routing later.

Next, select one of the active tracks in your song, something obvious like some drums or a prominent melody. On the bottom left of Renoise open the Track DSPs tab and scroll down the list and double-click the #Send Device from the #Routing section. This will insert the #Send Device as the last item on the track's DSP effect routing.

Send Device default settings

By default the device will be set to Mute Source, the send amount at 0dB (full), and the Receiver usually defaults to the left-most Send Track (e.g. S01). So, as per the previous flow diagram, these initial settings means we are sending all the audio of your selected track to Send Track S01. Because you haven't set up any additional effects, you won't hear any change to the sound, yet.

Now click on the Send Track you have set up (right of the Mst track remember). We'll do a quick proof of concept to show the Send Track in use. From the Track DSPs menu insert the mpReverb effect on the Send Track. First alteration is to set the Dry Mix parameter to 0%, and the Wet Mix parameter to 100%. This will ensure that the effect is outputting nothing but reverberated sound and has no original sound mixed in. It's all wet.

mpReverb wet settings

You will hear that your original track sound has become entirely reverberated! Score 10,000 points! *bling!*

Thus far all the effecting has been in-line: but now we will alter the routing so it becomes parallel effecting. Parallel effecting will show the full routing possibility of Renoise's Send Tracks. So, go back to your original track and focus on the #Send Device. Switch the send mode to from Mute Source to Keep Source. Immediately you will hear the original signal come through the mix dry, at the same time as the reverberated sound. Furthermore, you can control the amount of reverb level directly from the #Send Device by adjusting the Amount parameter. For example, you might find that an Amount of -18dB is just enough reverberation relative to the original sound. Adjust to taste.

Send Device parallel routing, Keep Source

In summary, you can now see and hear a parallel effect routing, where a 'wet' reverb sound is alongside a 'dry' input sound. This illustrates the basic possibilities of using Send Tracks in Renoise. Congratulations: you are now an initiate into the art of sending.

In addition, one of the major reasons for using a Send Track is that we can send more than one sound to it. For example, you want four different tracks with four different amounts of reverb echo added to each; then it is as easy as setting up four different #Send Devices, one on each track with individual Amount adjustments. This is a very neat and efficient way of mixing, and can add a unified feel to your mix due to using common effecting across your tracks. Why have four reverb effects when you can just have one? Use a Send Track. This conserves CPU usage as well.

But, we don't need to limit ourselves to a simple reverb routing: in fact, the creative possibilities with send routing is limitless and exciting! Let's explore:

Common Wet Effect Sends

The two most common send routings are for purposes of reverberation or echo. These are 'wet' parallel routings much like the example provided above. Let's look at these common routings closely and see how we can make them optimal.

Continuing with the same reverb routing as above, now focus on the Send Track. Tweak the mpReverb settings to tease out a different sound: Duration of +6000ms; Predelay of 0ms; Low Cut open to 4999hz; Low Gain reduced below -12dB (to filter out low muddiness); Colour Off; Width set to Normal; Pan 7 L (a little to the left); Wet 100% and Dry 0%. Now the reverb is longer and a little more airy feeling.

Have you ever noticed that digital reverb (as opposed to real life acoustic reverberation) sounds lifeless and unconvincing? This problem is especially noticeable with input sounds that are sonically repetitive (like simple drum samples). Well, this problem can be addressed in part by some modulation before the reverberation. To do this, insert the Renoise Chorus DSP into the effect chain, and drag it so it is before the mpReverb effect. Change the Chorus parameters so that it becomes a simple pitch modulator like so: Dry/Wet to 100% (so it is all wet); Rate slowish around 0.4hz; Depth at 40%; Delay at 0ms; Phase to mono; and the rest as is. The Depth parameter will control the amount of pitch modulation and will cause the reverb echoes to have a more liquidised, or organic sound. Colourful reverb!

Chorus and reverb settings to get colourful verb

Next, let's tidy up the reverberated tone. Sometimes a Low Pass (LP) filter can help focus the sound to the mid range frequencies. Add a Renoise Filter3 DSP to the effect chain after mpReverb, select the 24dB Moog curve and drop the cuttoff frequency to around 4700hz or lower to taste. Another common tone alteration is to EQ some of the hazy excess in the mids. Open up EQ5 on the effect chain after mpReverb. Select one of the mid frequencies and set it to 840hz (or thereabouts), set the Q narrow to about 1.20 and reduce around -4dB. Another common reduction point is 2khz but a little less with around a -1-2dB reduction. Or whatever settings to taste, depending on how the input sound is behaving through the reverberation.

Once you have tweaked the parameters to carve out a superb sounding reverberation you can go back to the #Send Device on the original track and re-adjust the send Amount. Hopefully you will find you have a lovely sophisticated reverb effect using entirely native Renoise effects. I've made up an effect chain you can download here and put on your own Send Track that shows this idea in action.

What about some echo? What about some echo?

Send echo (or delay) uses the same approach as above. We want completely wet echo in the Send Track, with possible pre-modulation and tone filtering. Do this first and don't forget it: enable the Mute Src. button that prevents any of the dry signal to sound in the Send Track. If you miss that button then you'll get the dry signal messed into the mix. In this example I'm creating a mono echo sound by using the Line Sync, setting both sides to 6 steps. I love epic echoes, so I'm putting both feedbacks to 72%, and everything else can be left as is.

Delay with mute src enabled

As before, use the Chorus before the delay to cause a subtle or obvious 'tape wow' pitch modulation effect. Then you can focus on filtering and EQing the echo tone using LP filters and High Pass (HP) filters. Always go back to your original track and adjust the #Send Device Amount to get the mixing level of the echo right. Finally, you can go through all the tracks and your mix, and see what might sound nice sent to the echo Send Track. I've made up an example effect chain you can use on a Send Track to use as a filtered send echo, downloadable here.

Width Effect Sends

Echo doesn't have to be long and epic. Two differing length short delays, panned left and right are commonly used to improve the stereo image of sounds. Here's how to do it. Make up a new Send Track with a Renoise Delay DSP with the Mute Src. button on. Set the L Delay to 7ms and the R Delay to 11ms (these can be tweaked to tune in better with your source sounds). Set the feedbacks to 0% so there is no unwanted resonance caused by the short delay. Now go to the L/R Output Pan sliders and 'swap the channels' by panning the Right all the way left, and Left all the way right. This will mean that stereo sounds will echo off on the opposite side, which is brilliant for creating additive width.

Short delay used in the Send Track to provide width

It's generally good practice (although not always all the time) to keep low frequencies out of the sides of the stereo image. In plain-speak, this means little or no bass out on the left or right: just in the middle. Because we've used the Delay to throw echoes of the sound out left and right, then we can tidy up the low frequencies using a HP filter. For this task I tend to like the HP 4n Butterworth filter set at 777hz or above. Additionally sometimes a LP Filter also works on the wide echoes to roll off detail above 13khz or lower. It depends on what part of the sound you'd like to focus in the width. And as always, go back to your #Send Device and adjust the send Amount until it is just so.

You can use the Chorus to achieve a similar width effect in using a Send Track, with the added bonus that you'll get some pitch modulation as well. Replace the above Delay with the Chorus effect and set the Dry/Wet parameter to 100%. Tweak the settings to taste: the key attribute that makes the sound 'wide' is the Phase parameter. Again, tweak the filters to focus the sound and prevent wide mud. Used subtlety or wildly, a lot of pleasant sounds can be explored here. Which leads us too...

Not-So-Common Send Effect Madness

The Chorus becomes a fairly amazing tool once it is liberated to a Send Track. Have you ever noticed if you're using the Chorus in-line on an effect chain that the Dry/Wet slider reveals a weaker, darker sound the closer it is to 50%? Try it out. That weaker feeling is caused by a cross-fader algorithm that does not maintain equal power throughout the range. This bugged me initially, as I tend to think of chorus as an 'additive' effect: something you add to colour the sound without loosing the volume and presence of the original sound. No big problem though, because we can use the Chorus in a Send Track and use the #Send Device to control the amount of 'additional colour' without loosing the feel of the original sound.

This is where the Chorus can be used as a traditional 'liquidiser'. In this case it is best to adjust the Chorus Phase to 0 so that stereo image remains unchanged. Of course you don't have to go for traditional: you could go wild with tweaking all those parameters to get a truly mental sound. Go for outrageous amounts of Depth, Feedback and Delay and see where it takes you.

Any why limit ourselves to just the Chorus? Try out the Flanger and Phasers effects as well. These tend to work well in combination with the Chorus's Delay value use to provide a little separation from the source material. Just a little. And don't forget third party plugin effects: there are numerous 'wet' style effects out there. These include all sorts of creative modulators, spacial effects and glitchy style buffer-divisor effects.

You can really take the sounds to outer-space with creative use of the *Mapping and *Modulation devices (such as the LFO and Signal Follower). Complex modulations and combinations of effects will yield exciting results. You can use this complexity to eek out organic realism (such as analogue variability) or out-of-this-world sonic insanity. Go forth and creatively modulate!

Finally, don't forget that you can alter where the #Send Device is positioned in the original effect chain. This is another avenue for exploring creative results. An example you might have heard before in mixes involves a standard parallel reverb routing. Try setting the #Send Device to Keep Source and placing DSP effects after the #Send Device. Here you can use a Gainer and automate a fade (in or out) that will serve to bring the dry sound in and out of focus while the wet is continuous in the background. And why stop with a simple Gainer? You can put anything you have available there and effect the dry sound after the send.

Group Sends

The other major way you can use #Send Tracks in Renoise is to do what some applications call 'grouping' or 'bussing'. This is where the sound of many tracks are sent to a common Send Track for group processing. This technique is usually an in-line technique, meaning that all the #Send Devices are set to Mute Source. Obviously, you can send as many tracks as you want into one Send Track, as well as send other Send Tracks into a common track for some complex summing.

The most common application for this technique is to send all the percussion sounds into one 'grouped' Send Track. Typically this is where compression, saturation and tone modifying is used to alter the percussion sound in a unified way (sometimes called 'bus compression' in analogue mixing).

Drum tracks being sent to a common Send Track

Group Send Track for all the drum sounds to be commonly effected

One trick I like to use on lofi drum sounds is to use the Chorus as a gentle pitch modulator at the start of the group Send Track. This ideas is discussed in this thread, and the general aim is to cause a slight 'wow' tape wobble effect that make the drums feel more organic. It can really save your ears from some sonic fatigue.

Once you have a group Send Track established you can send the output of the group  to another Send Track to add a little reverb or echo. Or to any other innovative Send Track you may have made up.

Group sends are a fantastic opportunity to get out the distortion, dynamics tools and filtering effects to make up some unified textures and tones. The sky is the limit with what you can do, so there's no point in me listing all the possibilities here – it is up to your creativity and what you're aiming to do.

In Sum

By now I hope you are ready to become a Send Track ninja, and apply the above to your own work. So what are you waiting for? Go back to your mixes and get creative with Send Tracks! Ideas and questions are most welcome in the comments section.

Category: 

Back to Beats with Renoise 2.7 Beta

$
0
0

After the hack-and-dev onslaught from the previous release, beats are back in business with "probably the most complete music tool available on Linux, and even on Mac and Windows": the Renoise 2.7 Beta! Read on to see how you can join the party at a quite favorable entry fee. But let's have a look at the new features first.

Sample Keyzone Editor

New Features

  • Sample Keyzone Editor
  • Sample Slicing
  • Improved Automation
  • Redesigned Instruments
  • MIDI Input Routing
  • Real-time Line-In Rendering
  • Multiband Send Device

More details? See What's New in Renoise 2.7.

Renoise 2.7 Beta Celebration Sale - 30% Off

To celebrate the Renoise 2.7 Beta, for a limited time new accounts can be purchased with a 30% discount, lowering the entry barrier to Renoise's Beta phase. Existing customers can take advantage of the -20% reduced pricing on upgrades.

Sample Slicing

Category: 

Proud to Announce the First Renoise 2.7 Release Candidate

$
0
0

We're proud to announce the first Renoise 2.7 Release Candidate. Almost there! Registered users can download their copies from the Backstage. And for the first time in the 2.7 release cycle, unregistered users can check out the Renoise 2.7 Demo.

With the end of beta testing also comes the end of the 30% discount. But, because we're nice, we're offering a grace period. Anyone who wants to take advantage of the special price has until the 10th of May to do it. Get in there!

More goodies in the upcoming days. Watch this space for details.

Renoise 2.7 is the best

Category: 

Renoise 2.7 Final released + PureMagnetik & BeatSlaughter XRNI Packs (800 MB) For Registered Users

$
0
0

Eight weeks of community driven testing finish today. We are proud to announce that Renoise 2.7 is stable and ready for production! Thanks once again to our users, the best in the world.

New Features in Renoise 2.7

  • Sample Keyzone Editor
  • Sample Slicing
  • Improved Automation
  • Redesigned Instruments
  • MIDI Input Routing
  • Real-time Line-In Rendering
  • Multiband Send Device
More details? See What’s New in Renoise 2.7

Free 500 MB PureMagnetik XRNI Pack with your Renoise purchase

To commemorate this achievement we've teamed up with Puremagnetik.com to bring you "Puremagnetik XRNI Essentials Volume 1" - a hand-picked selection from their catalog of professionally multi-sampled instruments.

PureMagnetik

The sample pack includes such instruments as:

  • Analog Synth Basses
  • Circuit Bent Drum Kits
  • Buchla Drum Kits
  • Mellotron Strings and Flutes
  • Glitch, Toy & Lo-Fi Sounds
  • Fender Rhodes Mark II
  • Model-C Clavinet
  • Electric Guitar
  • Upright Bass
  • Classic Analog Synths
  • Grand Piano

and more!

BeatSlaughter XRNI SoundPack (300 MB) free for registered users

Additionally, Berlin based artist and longtime user Beatslaughter has blessed us with a touch of evil in his sample pack "Beatslaughter SoundPack Volume 1".

Those two sample packs total over 800 MB and let producers jump into all the latest sampling features of Renoise 2.7. The packs are free for all registered users new and old, and are waiting in the Backstage.

Tool Update Downloader

But that's not all! Act now and we'll throw in a Tool Update Downloader which automatically updates installed XRNX Tools. It's so easy even your grandmother could do it. In fact, she's learning Lua and scripting a new controller template for Duplex as you read this...

Always remember... keep it vertical!

Category: 

Artist In:Depth - Datassette

$
0
0

For the next installment in the Renoise artist interview series, we managed to persuade highly productive Renaissance man Datassette to take some time out from his busy schedule to talk about the good old days, creative mod naming, business funk, psy trance, tinned tomatoes, wretched filth and everything in-between. And Renoise self-evidently. Plus some pretty unexpected influences...

Who are you and where are you from?

I am a producer, programmer geek, design nerd, and occasional DJ attempting to do far too many things simultaneously, from the UK.

Taking your name from the classic Commodore tape drive, I'm guessing you must have been an avid C64 fan as a kid?

Yeah it was amazing at the time, and the SID chip still stands up as a fine synthesizer. I suppose the first ever real synth I ever heard 'in the flesh' was the SID. Previously, all the computer music I'd heard came from crappy monophonic beepers so hearing the title music to 'Midnight Resistance' for the first time blew my tiny mind to bits.

Do you ever use a real C64 for your musical endeavours?

A few of my older tracks feature the C64 cartridge 'Electrosound', others have samples from simple BASIC programs, and the Elektron SIDstation features in quite a few tunes. But in recent years generally I just stick to a choice handful of VSTs for the bleepy stuff.

I'm guessing you got into trackers that way and that Renoise was a natural progression?

I never actually used a tracker on the C64, none of my C64-owning school friends were aware of 'scene tools' back then. The first tracker I used was ProTracker on the Amiga in around 1994. I've got a drawer full of disks of utterly shit techno and breakbeat MODs from around that time, all with useful filenames like AAAA1B.MOD, or the unforgettable classics A1NEW7.MOD and NEWNEWNEW.MOD.

When my family got a 'mega turbo multimedia PC with twin speed CD-ROM' (66MHz whoo!) in around 1996 I somehow got hold of FastTracker II and promptly filled up the whopping 500MB harddrive with tons of crappy jungle tracks. Even after I'd moved out and gone to London I still had that crap old family PC running FT2 up until around 2001.

Around then I thought that in order to make 'proper music' you had to be using hardware, so I forfeited proper food for 7p tins of tomatoes with stale bread and spent my student loan on an AKAI sampler and some outboard FX. The only MIDI sequencer I could run on that old machine was Cubasis, which is a wretched piece of filth that nobody should ever have to use. The computer was barely functioning by then so I had to move the mouse pointer around with the numpad. Funtimes.

By around 2004, even though I was getting some quite good results from the hardware and a better computer running Cubase with VSTs and stuff, I still really missed FT2. I tried Skale and Buzz for a bit but they were unstable, and pretty much abandoned by their developers. I discovered Renoise in 2005 and it just instantly felt right, solid, a piece of software you could trust™.

Do you produce everything in Renoise or do you only use it for certain aspects?

Renoise for all production. Then I usually do some light post-production in Audition, and use Ableton for live sets.

I suppose being a programmer I really appreciate that Renoise allows you to very quickly enter precisely what notes, drum hits or effect tweaks you want just by tapping out the rhythms on the qwerty keyboard. Trackers just feel more 'open', like all the parameters and innards of the synths, effects, and samples are exposed at all times, just waiting for you to mess with them. Sometimes when jamming with friends who use Logic or Ableton I get impatient - because although those programs have lots of good keyboard shortcuts to help you, you're still pretty much entering notes with a mouse or trackpad, and it's torture!

Any particular feature requests for us devs?

I'm one of those odd people who want a Piano Roll! Tracker patterns are great for most situations, but when you're working with complex chord progressions it's really helpful to have a visual overview of the notes, so you can easily see which inversions or transpositions might work without having to interpret all that note data in your head. A native arpeggiator would be amazing also!

Could you tell us a bit more about your musical career, according to Discogs, your first release came out in 2001, have you been continuously active since then?

Pretty much been making music of some sort since 1994. I'd probably go feral and end up living in a hedge if I stopped.

Do you find that your tastes have changed over the 15 or so years you've been making music?

It constantly shifts, I might think Prog Rock, or early Acid House, or Bach's harpsichord fugues, or 60s garage rock, or incredibly naff 80s library music, or Trad Jazz, or anything else is the best thing in the world ever on any particular day. I can't think of any single genre that doesn't have at least one track that I don't love - apart from Psytrance obviously. :P I've been fairly obsessed with drone music for the past couple of years though, I'd like to do a drone album at some point.

You recently played the UK's consistently most interesting electronic music festival, Bloc. How did that go?

Yeah it was great, the room was packed out and people seemed to be into it. I had a problem with a dodgy midi controller and had to miss out part of the set while I remapped FX to the laptop keyboard but it still sounded good. I doubt anyone noticed at that stage of the festival!

How do you perform your live gigs? Have you managed to work Renoise into it somehow?

Renoise wasn't really suitable for live work up until the last couple of versions, but it's probably time for me to give it a try now, I know lots of others have got some interesting setups going recently.

In more general terms, do you prefer working with software or hardware?

10 years ago I would've said 100% hardware, 5 years ago I would've said the opposite, now I reckon a healthy mixture of the two is definitely the way to go. I only have a couple of hardware synths myself, but jamming at friend's studios with huge piles of the things is ace. When you're standing at a synth, you're not tempted to look at Tweetdeck, or try out that new VST effect you downloaded, or mess around with your soundcard settings, you're just playing an instrument.

Very true. You have released some pretty mindbending mixtapes on your website over the years, not least the magnificently titled Businessfunk series.

Hehe, mindbending is a great compliment! I tend to get obsessed about some particular area of musical history or other, so once I feel like I've sufficiently exhausted it it's good to produce something to mark the end of that particular binge. With the Businessfunk stuff there is a lot of crap, I mean really awful stuff, so it's nice to distil all that into a nice densely packed thing that people can enjoy.

How do you feel about the whole digital versus vinyl versus CD debate that many people seem to spend an inordinate amount of time occupying themselves with?

Meh. Vinyl distortion / saturation is evocative of a certain era in music history, and it sounds really nice. It's an aesthetic, and that's all there is to it really. When I hear people say things like "digital has got no bass extension, vinyl sounds really warm and fat" I don't know how to respond because that's complete bollocks on so many levels! A sine wave is a sine wave is a sine wave.

It's true that vinyl can store frequencies up to something silly like 80kHz that only bats and chihuahuas can hear, but I don't think that's even what the argument is about. Hardcore vinyl purists have probably just heard too many digital DJs playing 128k mp3s ripped off MySpace gurgling horribly at the wrong speed through Ableton's 'Beats' timestretch mode through a crap soundcard.

I do love records though, and sometimes it's nice to go out DJing without a computer. Operating turntables is definitely more fun than hunching over a laptop, but as for sound quality you're just as likely to hear a badly pressed record as you are a poorly equipped digital DJ.

You seem to keep very busy judging by your site. Any tips to us eternal procrastinators who never seem to finish a track?

Be harsh on yourself, if something in the track isn't quite working just delete the whole channel and instruments completely, save it, forget about it and do something else for a while. Come back after a few days / weeks, if it still doesn't work - just scrap the whole thing! It doesn't matter, you probably learned something by failing.

What do you do outside of music? What about all the nicely retro-looking artwork for your releases and your site? Is that your own work too?

I work as a freelance designer / developer at a web agency, I'm also working on Flash / Mobile games as a side project (slakinov.com). Making games pretty much involves everything I'm interested in - programming, design, music, so I love it.

Record sleeves are just another part of the music for me, and I like to be responsible for that too whenever possible.

On the games side, you're involved in something called Pixeljam Studios. How did that come about?

Pixeljam is a great pixel-style game company run by musician / programmer Miles Tilmann, pixel artist Rich Grillotti and musician Mark DeNardo. I put out some of Miles' music a couple of years ago on the record label project I'm involved with (handsette.net) and we've since worked on a couple of music commissions together. We're hoping to get involved with other game developers to do soundtracks - that would be the ultimate job for me!

I've actually just today launched my game Space Rubbish which comes with a soundtrack included (all made in Renoise of course). Along with Pixeljam, I think we're the first people to ever sell downloadable games as hidden bonus features inside MP3 albums in Bandcamp.

To finish off with, who would you say have been your biggest musical influences? Those artists that you keep coming back to over the years and that have meant a lot to you.

Too many to mention, but for sheer synth wizardry I'd say Isao Tomita. The stuff he was doing in the mid 70s still sounds incredible. Listen to his versions of Holst's 'The Planets' and Mussorgsky's 'Pictures At An Exhibition' - amazing stuff.

An interesting choice. Synth wizardry indeed. Thanks for taking the time, really enjoyed your answers!

Cheers!

www.datassette.net
www.slakinov.com

Category: 

Mutant Breaks #4 Renoise's most unorganized music competition since 2008

$
0
0

Theme

Once a year this shit is mandatory!

Deadline

Sunday, November 6th, 2011.

Genres

Electro / Bassline / Breakbeats / Jungle / Drum & Bass / IDM / Breakcore / Dubstep / Experimental / Noise

Rules

  • One entry per contestant.
  • Participants must vote for 3 different tracks or they are disqualified. Feel free to vote for yourself as one of the choices. It won't affect the outcome. It only serves as a collective benchmark for quality.
  • If the artist shares an XRNS, then total votes are multiplied x 2. Incentive to see more XRNS this year!
  • The top 10 tracks, eg most votes, are written on equal sized pieces of paper and put into a hat.
  • The first piece of paper that my ~17 month old daughter picks out of the hat wins $100 Canadian dollars, to be sent via PayPal.

Don't know what Mutant Breaks is? Don't understand the rules?

Well then, too bad! Nah, just kidding. Check the links from the last three years for some idea. Barely:

Mutant Breaks 2010Mutant Breaks 2009Mutant Breaks 2008

Submit your song here

Mutant Breaks #4 Discussion Thread

Drill and bass, for the ladies.

hammertime

Category: 

Download the Mutant Breaks #4 Vote Pack now!

$
0
0

Mutant Breaks 2011 Votepack

Here is the vote pack: MBC4.zip [194 MB]

There are 23 songs in this pack. Participants must pick and post their top 3 in the Mutant Breaks Competition #4 thread or they are disqualified. The top 10 go into a hat. My ~18 month old daughter picks a winner. I will make a YouTube video of this.

If you were not a participant you can still post, but your vote will be ignored. If some weird thing happens, like a bunch of tied tracks make it so that more than 10 are in the top, I will exercise veto power and truncate however I feel like it.

All songs in this archive are copyright, or not, their respective authors. Don't pull a Timbaland. Contact the authors before assuming anything. Sample at your own risk.

Some songs are OGG files. It's 2011, you should be able to playback Ogg Vorbis by now?! If not try:

Good times.

Category: 

Mutant Breaks #4 Winner Announcement

Renoise 2.8 - Beta Testing Starts

$
0
0

We are proud to present a new Renoise Release. Beta versions of our latest release are now available to all registered users at the Renoise Backstage. Everyone is invited to join our forums to welcome, discuss, tweak and help bug-fixing the new release.

Renoise 2.8 Features

Full 64-bit Support

Ever since our Linux users got a 64-bit version with Renoise 2.5, we've had a lot of requests for 64-bit support on all three platforms, and now it's ready. Running the 64-bit version, the memory-hungry among you can now take full advantage of the available resources in your machine, allowing you to break the 4 GB barrier.

Renoise 2.8 also comes complete with a native plug-in bridge, allowing seamless usage of 32-bit instrument and effect plug-ins inside the 64-bit Renoise process, and vice versa.

  • 64-bit versions for all platforms: Windows, OSX and Linux
  • Plug-in bridge allows 32-bit plug-ins to be used within 64-bit Renoise
  • Full Rewire 64-bit support

Reworked Pattern Matrix with Slot Aliases

Workflow has been the keyword for most of the 2.8 development cycle. Thanks to the revamped Pattern Matrix and sequencer, it's now easier than ever to arrange your songs. By aliasing individual pattern slots, you can lay out complete tracks in no time. The new sections feature allows you to add structure and overview, while the streamlined sequencer helps to keep your project nice and tidy.

  • Alias individual pattern slots in the matrix, i.e. treat them like clips
  • Edit one slot and have changes propagate to all other aliases
  • Quickly clone or alias slots by dragging their edges
  • Use section headers to group parts of the song together

Track Groups & Collapsing

Another big workflow improvement is track grouping, which allows you to group related tracks together, and have each group share common effect chains. It's now also possible to collapse tracks and groups, which can do wonders for the overview of large projects.

  • Group tracks into logical units, collapse them for better overview
  • Flexible routing of group tracks
  • Collapsed tracks use minimal space, while still providing a quick overview
  • Pattern effects in groups will affect all member tracks simultaneously
  • Automatically collapse all tracks except the one you are focussing on
  • Color code tracks with adjustable background colors

DSP Effects and Meta Devices

And what would a new Renoise release be without a few new DSP effects?

  • New DSP Multitap delay for spaced out filtered echo madness
  • New DSP Repeater for st-st-st-stuttery goodness
  • New DSP Exciter to make your mixes sparkle
  • New Meta Mixer allowing blending of modulation signals into one output
  • Improved EQs with bigger graphs and all values can be automated
  • Improved Send devices, which can now be individually panned
  • New and improved crossover filters for the Multi Send device

Sample Editor

The Sample Editor has also got its fair share of workflow improvements.

  • Left & right channels can be edited separately
  • Zoom level & current selection are remembered per sample
  • Significantly faster sample loading
  • Destructively render slices to individual samples
  • Improved keyboard and mouse selection handling
  • Improved marker and waveform display visibility
  • New and improved processing tools (mute selection, insert silence, invert phase, swap stereo channels and cross-fading loop creator)

Improved Spectrum View

  • New Phase Correlation Meter in Phase Scope
  • Side-by-side comparison of two tracks in the spectrum view
  • New drawing modes: Filled Curve, Bar and Spectrogram
  • Configurable frequency scaling, precision, peak fall rate, and slope

Pattern Effects

  • Pattern effects in the master or group tracks will affect all member tracks
  • Up to 34 DSP devices can be addressed via pattern commands 1xyy-Yxyy
  • New pattern effects: Tremolo, Auto Pan, Set Envelope Position
  • Logical mnemonics for pattern effects from A to Z instead of cryptic numbers

Performance Improvements

  • Hyper-threading support for new Intel i5 and i7 CPUs and others
  • Various audio engine speed optimizations for all platforms

Other Workflow Improvements

  • New Favorites system for plug-ins and native DSP devices
  • Expandable and detachable Envelope Editor
  • Memorize last used bank/preset paths per plug-in
  • Automatically name rendered songs/patterns
  • Right-side modifier keys are no longer hard-coded
  • Finer control over note distribution when dragging samples into keyzones
  • Improved color picker with saveable swatches
  • Context menus overhauled and made more consistent

Under the Hood

  • Quicktime is no longer needed to import MP3 files on Windows
  • Plug-ins are woken up from auto-suspend when clicking on their windows
  • Support for mono capture devices on OSX
  • New Jack implementation on Linux
  • Trimmed overall memory footprint
Category: 

Artist In:Depth - Cristian Vogel

$
0
0

The latest in our series of In:Depth interviewees should need no introduction. Since debuting on Dave Clarke's label with some crunchy, abstract techno offerings in the early 90s, Cristian Vogel's been continously keeping busy exploring everything from sound design to live improvisation to contemporary dance productions to good old wonky techno bangers.

Photo by Brian Stevens

And now he's making a Renoise album. It's called The Inertials and is a collection of "shiny new techno/electro with many layers of rhythm programming, sound design and microdetails to surprise, freak-out and delight" according to Cristian himself. Another unique aspect of this album is that it's fan-funded via PledgeMusic. Of special interest to the Renoise crowd should be that by taking part in this funding process, you can get your hands on actual Renoise XRNS files of Cristian's latest tracks among other things.

Can you tell us a bit about what you're up to at the moment?

Right now, I am getting together a new album of electronic sounds, leaning towards a more beat-driven style than my last full-length release on SubRosa.

It's taken me a long time to figure out how to get back into recording and releasing material this time, as things have really changed a lot for me. I no longer have my own analogue studio, since the Station 55 studio in Barcelona closed down in 2010. I needed to come up with a way of raising the final studio mixing costs up front, so I decided to go for PledgeMusic, one of the fan-funding models that have sprung up from the ashes of the old style music business.

What made you decide to go for this approach rather than a traditional release?

So many reasons. Back in the mid-90s when I was part of the No Future collective in Brighton, I was always anti-music industry, we used to call it underground back then. I was into DIY culture, cassette labels, spread-by-mail, white labels... Generally trying to avoid what was already an artist-unfriendly situation with major indie labels and pressing/distribution deals. I chose PledgeMusic over the other options, because it was dreamed up by a UK musician, Benji Rogers. In my opinion, you gotta be an artist to know how tough it can be, so as to build something more fair.

PledgeMusic is based upon a simple idea. Instead of an artist or group investing their own money up front on recording and mixing, based on the vagueness of possibly recouping those costs from sales, this model tries to raise the money upfront, over a 60 day timeframe. Funds are pledged by fans, friends and family in return for exclusives such as signed vinyls, previews, even backstage passes, exclusive concerts, or whatever the artist wants to offer! In my case, there's also Renoise XRNS files of the album tracks up for grabs.

Essentially, it hinges on the idea that if an individual would be interested to buy the record in the store when it comes out, then by the same initiative, they can pay for it upfront and wait until its made. This way they participate in its creation, the artist gets a much better income stream from their music vision and from their own creativity just when they really need it.

Also, the connection with the audience is no longer an imagined one. The support from the pledgers comes at a critical time, when an artist needs to be especially motivated, positive and strong - that is to say, during the creation period (I think touring is much less demanding than composing). And these days, writing and recording is a really tricky project to manage. You need months focussed on inventing great music. On top of that, its got to be up to the standard that demanding listeners expect! Without the budget for the equipment, time and resources - not to mention food and drink, I don't know how anyone expects new music to happen! Thats why I think the fan-funding model is a really good idea, all round.

More here: www.pledgemusic.com/projects/cristianvogel

And for this project, you've made Renoise a big part of your working process. What attracted you to Renoise?

Well, like many others from my generation, I started getting really seriously productive on my Amiga using ProTracker. Back then, we traded floppies by mail, this radical idea of a software sound sequencer, from the people for the people. PT2.0 just popped through my letterbox one day - no user guide and plenty of vibe! I was hooked straight away. I waited for almost 20 years before someone built on that amazing legacy, and did it properly. So when I installed Renoise back in January 2009, man, I was hyper excited. Proper back to the future trip.

For what aspects of production do you use Renoise?

I stopped making music with trackers around my 5th album (All Music Has Come To An End on Tresor Berlin)... I went off and studied synthesis, mixing and modular thinking which led over many years to an object-oriented approach to composition and sound design. So, a big part of my compositional thinking happens in realtime code, using the Kyma music language. I see Renoise as more similar to a procedural kind of paradigm, sound events which are scheduled to happen on a clocked linear timeline. On the other hand, Kyma, SuperCollider and Max/MSP are more object-oriented where all manner of music objects can be invented, can exist simultaneously and exchange messages.

Basically, as some coders will tell you, a creator needs to be down with different approaches to design, in order to reach a good solution to a problem. In the context of computer music, the problem is compositional, and the solution is the sound of the finished piece.

So I use Renoise to arrange audio files and decide where to fix them in place on a quantised linear timeline. In other words, placing samples on ticks, patterns of samples in a sequence and so on. I also use Renoise for producing sound design elements, like rendered wavetables or audio prints for further manipulation in Kyma.

How do you perform live at the moment? Have you managed to work Renoise into it somehow?

I use Kyma live, a sound I have been developing for about 6 years called "The NeverEngine" with which I can improvise techno in realtime. I use some sounds from Renoise sketches, as source in there. I am considering presenting the new album live in Renoise, as its less about improvisation... Stay tuned for that!

Certainly will, that sounds very exciting. Any particular feature requests for us devs?

Well, the new 2.8 beta has pretty much got it all covered. You guys are doing a great job!

Thanks for the nice words! What about Kyma, how did you get into that, and what does it give you that similar tools don't?

Sound quality primarily. DSP hardware that is only concerned with music making and sound design, no mouse or email or graphics...

I needed to push past a kind of "modular" way of thinking, so that's how I got into it. It's a difficult learning curve though, I had to dedicate a number of years to reach the deeper levels of what's possible. Which has been great fun!

Do you work mainly with software these days, or does hardware feature to some extent?

Apart from the Pacarana (Kyma's dedicated hardware component) and the MacBook, it's all software. I design in code and in the tracker, but I also have many years experience with outboard, mixers, dynamic processors and so on. So I try and always get out of the box, and dig some studio time... Hence the PledgeMusic project! >>Nudge<<

What technology have you used throughout the years, and what's been your favourites?

I loved the EMS Synthi, sadly had to sell it off. I love the colours of analogue processing equipment, especially at the mastering stage. It's another universe of sonics, and they combine well with digital sounds.

What was your involvement with the film Enter The Void from a couple of years ago?

Cool movie. They used a track I made in 1993, Cancion Sintetica in all the club scenes. Thomas Bangalter used some of my more up-to-date sound design amongst the layers of that incredible 2 hour sound mix that accompanies the film from beginning to end.

So it was more a case of them using your work after the fact than you being actively involved in shaping the soundtrack?

Yes, Gaspar Noé (the director) wanted that track specifically. Just goes to show how you can never predict what will happen in the future with the tunes you make now, so make them robust enough for the long term!

To finish off with, who would you say have been your biggest musical influences?

It's so tricky to say definitively, but I'll just drop a few... Howlin Wolf, Rhythm & Sound, Talking Heads, Drexciya, Charlie Parker, Bo Diddley, ...And You Will Know Us By The Trail Of Dead, Burial, AtomTM, Tod Dockstader, The Young Gods, Night Of The Brain, Fog, Black Dice, Tortoise, Sonic Youth... Well, you get the idea - all the mavericks!

www.pledgemusic.com/projects/cristianvogel

Category: 

Welcome to a new www.renoise.com

$
0
0

To celebrate the first public release of the new Renoise 2.8, we also decided to give the website a much needed overhaul. Along with a new look, the different sections have been streamlined in an effort to make the site easier to navigate.

Another aim has been to try to provide a better introduction for newcomers to the world of Renoise. The What is Renoise? section summarises all the unique capabilities of Renoise on one page.

The new site is still a work in progress in some areas, so do let us know if you stumble across anything that doesn't work as it's supposed to.

Category: 

10 Ways to Extend Renoise's Internal Sequencer

$
0
0

Welcome to my first in-depth article. Here, I will attempt to provide a bit of overview in a specific area of inspired and unique scripts from fellow Renoise hackers. Hopefully, this will be the first in a series of ongoing articles about this subject!

First, let's put things into a bit of perspective: ever since Renoise 2.6 arrived in late 2010, we have been able to communicate with external hardware, build custom user interfaces and perform direct manipulation of pattern data - all of which could be considered prerequisites for creating a sequencer. Since then, numerous tools have appeared, each one with it's own unique spin on things. Some are meant for live usage and might depend on physical hardware, others are aiming to be used as "offline tools" that employ an algorithmic, rule-based approach. While we shouldn't forget that Renoise itself is a pure-blooded sequencer, what these tools all have in common is that they create something, manipulate notes in a way that expand the capabilities of Renoise.

All right, with the introduction in place, let's start with one of the more obvious choices:

#1: Lauflicht Step Sequencer

Category: step sequencer
Author: Cie

This is one of the first sequencers that appeared for Renoise, and it has been continually developed ever since. I would not hesitate to call it one of the most mature "classic" step sequencers for Renoise.

The interface is pretty straight-forward, with a number of rows representing tracks/instruments, and columns representing notes. In the middle, you get a lot of checkboxes, each one representing a note. Edit-step is considered too, and useful if you want to program a rhythm with a beat for e.g. every 4th line (it will simply show every 4th column in such a case). At all times, the Lauflicht user-interface is synchronized with Renoise, changes in the sequencer being output to the pattern editor and vice versa.

Each note-step can be set to represent between one and three notes, sharing the same basic settings (velocity, delay and length). If these basic parameters are not enough, you can use the "controller matrix" to refine the sequence - it allows you to specify just about any type of parameter per step.

All of the important parameters in the sequencer are mappable via the standard MIDI mapping dialog. This means that you can use just about any MIDI controller with it, but as with any tool that relies on standard MIDI mapping, communication with the controller is a one-way-street: you only *recieve* messages from the hardware. However, a commercial "Launchpad edition", complete with bidirectional communication, can be purchased directly from the author on his web site.

#2: Baguetter

Category: FX switcher / sequencer
Author: Kaneel

This is a special tool which takes a bunch of Track DSP effects and turn them on/off in sequence (if you are familiar with the famous VST plugin "Glitch" the concept should be familiar). The Baguetter also comes with it's own features for randomizing the sequence, and writing the sequence into a pattern - useful when you just want the resulting sequence without having to run the tool. Humourously, you can rename any device to "MCHAMMER", and the tool will skip that particular effect. As Kaneel writes: "yes, just rename to MCHAMMER, because he can't touch this... device"

#3: Cells!

Category: sample based sequencer/performance tool
Author: mxb
Link: forum

Cells! is quite a piece of work. If mxb decided to recreate Ableton Live's interface in scripting as a proof of concept, he could have stopped adding features halfway through. Instead, he decided to add a lot of useful workflow features, and make it into something else than just a cheap Ableton clone.

At it's most basic level, Cells! will allow you to gather a bunch of samples which can then be organized in a session view, much like in Live. A clip in Cells! (each one being a sample within a specially prepared Renoise instrument) can either be looped or one-shot, but it doesn't stop there: a loop can be re-pitched or granular stretched (the latter kind preserves the pitch and tempo, but at the cost of some audio fidelity).

Since Cells! exist in it's own workspace (it creates a bunch of sequencer/send tracks on startup), it comes with features for collecting/rendering "stem samples" from your existing songs. You cannot use Cells! alongside your song, but in a rather unique twist, you are able to store "riffs" (pattern-track note data which are stored in the instrument itself).

Oh, and did I mention the multi-player network feature (multiple machines runnings Cells! over a LAN connection), or that it comes with it's own controller framework which makes bi-directional support for hardware possible?

#4: Duplex: Grid Pie

Category: pattern-based sequencer/performance tool
Author: Conner_Bw, danoise
Link: forum

The basic idea in Grid Pie is to allow matrix slots to play, independantly of each other. Quoting from the tool page: "Grid Pie is a performance interface. It lets the user combine different parts of a linear song, non-linearly, in real time, using a special looping pattern as a live drafting area."

The original version was created by Conner_Bw during the Montreal music hack-day, and then a follow-up was released which allowed for differently sized, but seamlessly looped patterns/slots. Today, Grid Pie has been ported to Duplex, where it has gotten extensive, bidirectional controller support - but perhaps most important, an even closer integration with the Renoise workflow, as well as features that make it well-suited for live performances (special attention is paid towards keeping the beat at all times, etc.).

Recently, an extra feature was introduced which make Grid Pie suitable not only as a performance/remix type tool, but also in the compositional stage: basically, any & all changes to pattern-data are synchronized between the source pattern/slots and the live drafting area.

Note: "Rableton Dive" is another tool which promise to provide this sort of Ableton Live'sque functionality in Renoise, but as it seems quite limited in it's present state we decided to skip it for now. Perhaps the next article in this series will be different :-)

#5: Duplex: StepSequencer

Category: step sequencer
Author: daxton, danoise
Link: forum

The Duplex StepSequencer has the privilege of being the first scripted sequencer in Renoise. It was, and still is, a basic but functional step sequencer. And thanks to Duplex it runs on every type of controller that has enough buttons to operate it (like the Lauflicht, this type of step sequencer is more suited for a 'grid' type controller than a controller featuring dials or faders).

Features include full synchronization between pattern content and controller (will display velocity as different color shades, if possible), and the ability to specify velocity and/or pitch multiple notes at the same time (press and hold multiple buttons to perform actions to multiple notes). Finally you can copy and paste notes by holding a button pressed for a moment, and you can easily establish a relationship between a track and an instrument by assigning the same name to both.

#6: Duplex NotesOnWheels

Category: phrase sequencer
Author: danoise
Link: forum

Notes On Wheels (N.O.W.) is well suited for dial, or fader-based controllers. This fact alone sets it apart from many of the other sequencers in this article, and makes it capable of running on a much larger slice of hardware. As for the sequencer itself, I created it for my own personal use, and as a result, it's much less user-friendly than most other Duplex applications. But once you get the hang of it, it's a surprisingly expressive tool.

On the basic level, you get between 1-12 notes running in sequence, each one residing in it's own note column. Each note/step offer independant control of pitch, velocity, sample offset, length/duration and note retrig. Alternatively, you can control these parameters for *all* steps at the same time, globally. Attention has been made to ensure that you can access most features with as little as 8 buttons + dials

As N.O.W. is a performance tool, it comes with many configurable options - do you want the sequencer to produce constant output, or only when touched? Do you want to to output all steps, or only the current step? Do you want to limit the output to the current type of parameter, to allow over-dub style recordings?

Finally, it's worth mentioning that N.O.W. is able to detect, and import sequences that originally was created by itself. This makes it possible to "roam" tracks, importing notes on the fly. No need for presets then :-)

#7: Duplex Recorder

Category: live audio capture/sequencer
Author: danoise

This is another tool made especially for live usage, perhaps more so than any other of the other tools. It works by taking control of the recording dialog in Renoise, so you can create multiple audio recordings and play them back/trigger/loop them - all in a single, integrated workflow.

Operation is designed to be extremely simple, and to work across as many devices as possible - how about recording takes while holding a microphone in one hand, and using the other hand to control Recorder wirelessly on a smartphone? Or playing a guitar while using stompbox/pedal-switches to record and loop stuff?

It seems that above all else, the Recorder wants to be practical: it supports sessions - once you make a recording, you can save the song and it's state will be restored the time it is loaded.

#8: Epic Arpeggiator

Category: advanced arpeggio generator
Author: vV

One of the early tools to grace Renoise, this is a advanced arpeggio generator which will allow you to create arpeggiating sequences (meaning, patterns that have a repeating quality but are not necessarily identical). In it's most recent incarnation (v3), it has become possible to generate pitch envelopes for instruments, as well as the more traditional note sequence. The ability to generate a pitch envelope is quite a novel feature which would allow you to associate a note sequence directly with an instrument. If we are talking about "instrument patterns", this is as close as it comes.

The only downside is...well, while vV describe his tool as complex, IMHO that is an understatement! I must admit that I have used it on a number of occasions with little idea about what was actually going on. It's inspiring stuff, and there is obviously some very clever tricks in there, but I can't help feeling a bit lost as to some of the nuances of this tool. Have you considered an Epic Arp workshop, mr. Vincent?

Note: Mxb's Resynth tool also comes with a simple arpeggio generator - similar to the pitch-envelope concept mentioned here - but can otherwise primarily be regarded as a synthesizer tool, and not a sequencer.

#9: ReNoam

Category: offline pattern generator, reorganizer
Author: f + d + k

This tool is a pretty special one - instead of providing a traditional GUI, ReNoam is purely text-based. You basically provide the tool with a set of rules, instructions which are written in a special format (grammar), and the tool will then re-arrange your song according to those rules. Additionally, each rule can be assigned a certain probability, a nice way of introducing random, or semi-random results.

Without going into specific details (as the tool comes with an pretty exhaustive and well-written manual), I think it will suffice to say that this tool provide us with a very powerful way of trying out ideas, without having to perform a lot of tedious copy/paste actions. And it goes to show how the combination of scripting in Renoise, and the whole concept of Renoise itself, lends itself very well to stochastic, rule-based methods.

#10: Clip Arranger

Category: clip-based workflow
Author: elmex
Link: forum

This tool has a bit in common with ReNoam, as it also employs rules in order to re-arrange content. But where ReNoam is an exercise in minimalism, Clip Arranger is quite the opposite: a complete, clip-based workflow that, amongst other things, is able to mimick Ableton Live's powerful "clip follow actions". And it really is a deeply integrated workflow: first of all, you can define "clips" as re-usable components of pattern data (by highlighting some part of a pattern and then right-clicking that selection). Also, you can write clips directly into patterns by using special FX commands. And finally, you are able to generate pattern data on-the-fly, a feature which is specifically aimed at live performance.

But, what exactly are those clip follow actions I mentioned just before? Well, they serve a very important purpose, as they allow you to set up specific rules about what should happen, once a clip has finished playing. Should the clip repeat itself once/twice/forever/randomly, go to the next available clip, a random one, etc. It's a very powerful system that allows you to set up an arbitrary number of actions for each clip, with deep customization options.

Special mention: Step Brother

Category: DIY hardware/software combo
Author: Cornbeast
Link: forum, blog

This is sort of a honoury mention, because you can't really download it as a tool. But the project is just too damn cool not to get a special mention here: basically, it is a hardware unit which looks like it is inspired by the classic Roland x0x sequencers (the 808 drum-machine and such) that act as a dedicated controller for a Renoise tool, which in turn can lay out a drumbeat and a basic synth/bassline.

The idea is to create something where every aspect of the music is readily accessible, and can be changed in an instant - perhaps to avoid the deep complexity of modern audio software? All the way from an idea, or concept to a physical prototype, the entire process has been documented on both the Renoise board and the author's own blog.

Conclusion

Looking beyond sequencers, the Renoise tool ecosystem is full of hidden gems. Rableton Dive and Resynth, mentioned but not covered, are what we call bleeding edge tools. The general convention for authoring a new tool can be described as (1) start a thread in the scripting forum, (2) get feedback from the community, and finally (3) release and maintain on the tools page. There are dozens (and dozens) of add-ons that haven't yet been pushed to the tools page - these probably deserve an article on their own, but I digress... Eleven unique sequencer tools to try. Code your own and make it twelve? And you can easily uninstall a tool you don't end up using with Renoise's built-in Tool Browser. If you haven't already why not dive in?

Have fun discovering new scripting possibilities in Renoise.

Category: 

Mutant Breaks #5

Mutant Breaks #5 Winner Announcement

$
0
0

We've got a winner! Thanks to No Weapon for letting us shoot the announcement in their studio. As promised here's the video of my daughter eating cake.

All songs available here.

See you next year?

Category: 

Audio Mangling through Slicing: Slice Markers Explained

$
0
0

Sample slice markers were added to Renoise in version 2.7. In this article, I will go into a little bit more depth about what they are, how they work, and some interesting uses you can put them to. So if you haven't yet familiarised yourself with this feature, read on.

Before starting, it helps to have a MIDI keyboard hooked up to Renoise. But if not, triggering notes from the computer keyboard will of course work as well.

What's a Slice Marker?

Here's what the slice markers look like.

At first glance, they might appear to be some sort of warp/stretch markers, but appearances deceive. Slices do not warp or time-stretch the audio in any way, they are simply trigger points within a sample.

The most obvious use for them is to chop up a beat. Both the hip hop and drum & bass genres are almost entirely built on this technique. Load up a drum loop and hit the 
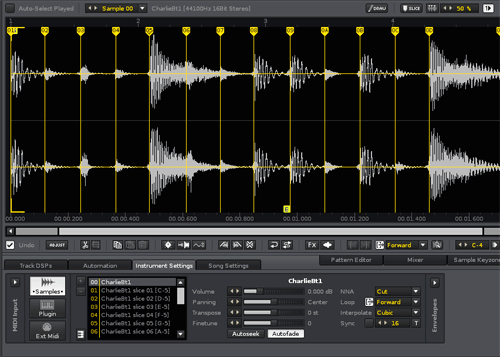
button in the toolbar above the sample waveform display. Renoise will now try to detect the attack of each individual hit in the sample. Since there is some guesswork involved, this process is not always 100% accurate. Should that happen, you can always adjust the created slice markers manually by dragging them, adding new ones by enabling the button or delete them by double clicking (alternatively select a bunch and hit Del on your keyboard).

If you get too many or too few markers, you can try adjusting the percentage value next to the button. It controls the sensitivity of the beat detection; the higher the number, the more markers are created.

Real-time Triggering

Now to the interesting bit, triggering slices from the keyboard. Move over to the Sample Keyzones tab. You should now see something like this.

As soon as you add a slice marker in the Sample Editor, the Sample Keyzones will switch to Drum Kit mode and automatically manage the keyzone layout for the instrument. This means that each individual slice will be mapped to its own key on the keyboard. The first zone represents the full beat, while all the rest are assigned to one slice each. At this point, you're all set to create a completely different beat by some judicious hammering on your keyboard to try different combinations out.

By default, Renoise will lay the slices out in consecutive order, using both white and black keys. If you'd prefer to only use the white keys for triggering your slices, click the arrow next to the Drum Kit button in the toolbar above the keyzones display and choose "Use White Keys Only". Then click the Drum Kit (short for "Generate Drum Kit") button and the slices will be repositioned to white keys only. To change the starting key for the slices, edit the note value labelled "from".

When playing a slice on the keyboard, you'll notice that it will stop playing as soon as playback reaches the start of the next slice. If you'd rather the slice carried on playing past the next boundary for as long you hold down the key, head back to the Sample Editor and locate the button in the top toolbar. This toggles the playback behaviour between stopping at the next slice and continuous play. Which mode you will use depends a little bit on what you're trying to create. If transplanting the original loop into something at a different tempo, it helps to have single-slice triggering enabled, but if not, try and disable it. If you're lucky it might give rise to some hard-rocking syncopated funk.

Sequenced Triggering

You can of course record your rearranged beat to the pattern using the notes assigned to the various zones, but there's also another way. Renoise has always had the S sample command for triggering samples at an offset, you can read about its traditional use here. For a sliced sample however, the command works differently. Notice the number displayed in the little flag at the top of each slice marker. Use this with the S command to trigger that slice.

Note that you will need to enter the note corresponding to the very first keyzone, i.e. C-4 by default.

If you enter a note corresponding to one of the slices, the S command will then offset into that slice. It will then work just like the S normally does, but only for that particular slice. I.e. the slice will be split into 256 evenly sized chunks which you can jump to by specifying a number between 00 and FF for the S command.

Slices are Aliases

If you now open the Instrument Settings tab and choose the Sample subsection, you'll see that there's an entry in the sample list for each slice. These are not normal samples, but are actually aliases to the sections of the full sample created by the slice markers. These aliases will get updated automatically as you move slice markers around in the main sample. For that reason, you can't edit the waveform of these samples since they are only read-only windows onto the full sample residing in sample slot 00.

If you want to apply any destructive sample edits to one slice only, you can still do this by selecting that slice only in the master sample waveform. To make this easier, turn on Snap and choose Markers from the drop-down. Selections will now snap to slice boundaries, and double clicking while holding down Ctrl will automatically select a whole slice.

You can however edit all the properties of these sample aliases, creating variation by modifying the way individual slices sound. Volume, Panning, Transpose, Loop etc all apply separately to each individual slice. Try setting a loop on some of the slices, or pitching some of them down/up using the Transpose slider.

Should you wish to convert the slice aliases into real samples once you are happy with your cuts, you can do that by right-clicking in the Sample Editor, go to the Slices submenu and choose "Destructively Render Slices". This converts the sliced instrument into a regular multi-sample instrument.

As you move around in the sample list editing properties, you will notice that the sample display changes to show the waveform of only that slice. By default, triggering notes from the keyboard also causes the selected slice to change to the last one triggered. If you find that this gets in the way, there is an option to switch it off labelled "Auto-Select Played" to the left above the waveform display.

Beyond Beats

Going beyond basic beat slicing, slice markers are also useful for a lot of other things. For longer vocal or instrumental takes for example, it's often easier to split the different phrases up with markers instead of chopping the take up into individual samples. That leaves more flexibility for finetuning later. They're also perfect for more radical vocal chopping or general reconstructing effects, which those of you into the sound of Todd Edwards will probably appreciate more than others.

And why stop at vocals or beats? It's great fun to throw in snippets of full tracks, slice them up tightly and then completely reconfigure them. Load up a suitable sample, and before you run the automatic beat detection, enable looping on the original sample. This is because any properties set on the master sample before slicing will be copied over to all of the slices. If you forget this step and want to make all slices loop after you've sliced, you can also select all aliases in the sample list and enable looping in the properties to apply it to all of them in one go. This will create lots of different-length loops which more often than not give rise to interesting rhythmic/melodic effects when triggered in suitable combinations. By loading up a sample from a 70s/80s soul or rock track, looping and sequencing a few short slices, adding a kick and a hihat, you will be able to reproduce the entirety of The Field's early oeuvre in no time.

I hope you'll find the slice markers a source of inspiration for creative sample mangling.

Category: 
Viewing all 60 articles
Browse latest View live


Latest Images